Deepfakes?
Let’s start simple. Deepfakes are video clips in which a filmed person is replaced with the likeness of someone else, using deep-learning algorithms. The end result can sometimes be so realistic that it is sometimes difficult to distinguish between real and fake videos. It is therefore technology that has already been discredited, especially if it is used without the permission of the person depicted. An example of deepfakes can be found below:
FaceApp
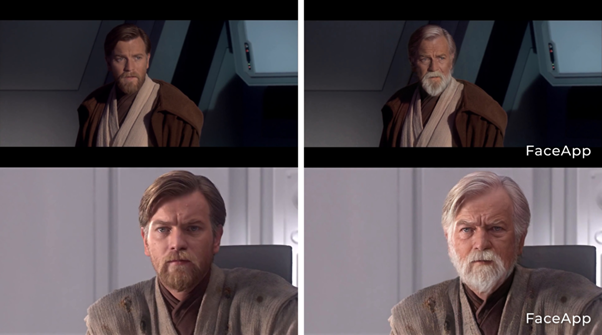
It’s very likely that you experimented with “FaceApp.” last summer, the app went viral and social media was full of photos. With this app you can upload a photo of a person, which person will then be aged by the app, using AI. Even more specifically, you could even change the age, hair color and even gender. But we noticed that the feature to change age worked particularly impressively well. Some people even compared how well the app matched reality by uploading some old photos of famous old actors, aging them in the app and then comparing them to what those actors actually look like now. Enjoy the great results:
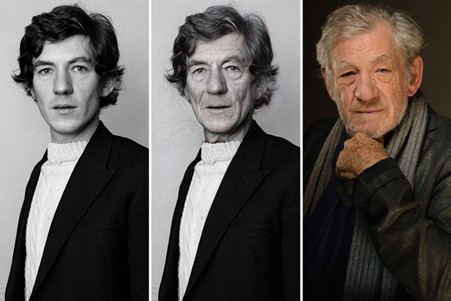
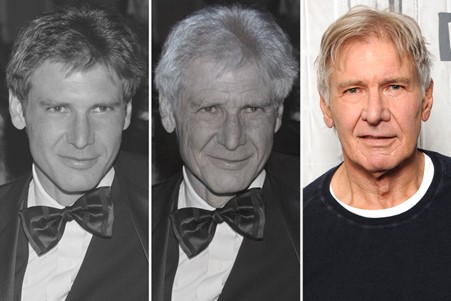
As you can see, the result that FaceApp generates is quite impressive, and further testing also proves that the technology is relatively stable when unleashed on larger amounts of images. But how does that work? How does this app make people older? How does it predict how people will age?
Generative Adversarial Networks
This question is not easy to answer. The makers of the app only reveal that “AI” is used, but there are of course many types of smart algorithms. It is speculated that the creators used Generative Adversarial Networks, or GANs. GANs are a form of machine learning where two neural networks compete with each other to generate new data with the same metrics as the training set. This is a technique used, for example, to generate images of faces or birds that meet specific criteria. For example: I want a black and green bird with a very short beak (see photo).
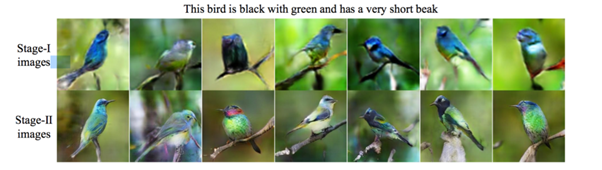
Result of Generative Adversarial Text to Image Synthesis Researchers have tried to use GANs to change the age of a person in an image as well. But it seems quite unlikely that Faceapp only uses GANs. All recently published academic results in this area regarding aging via GANs do not even come close to the results achieved with Faceapp.
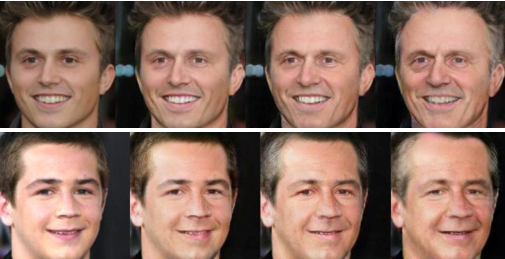
Face Aging with Identity-Preserved Conditional GANs (2018)
Learning Face Age Progression: A Pyramid Architecture of GANs (2019)
Process of our use case
For the use case of this workshop we used DeepFaceLab. DeepFaceLab is a free, extremely user-friendly software package. You can find an excellent tutorial on how exactly it works here. At the start of the use case, our hypothesis was that we would be able to adjust the AI model late in training to slightly adjust the actor’s physical appearance. Which would mean that we could train the model on a large dataset of original input faces of the original actor, and only later adapt it to a small dataset of outdated faces (person we want to process in image). This turned out to be correct and is instrumental in making this process work. So, what exactly did the process look like?
Source and Destination images
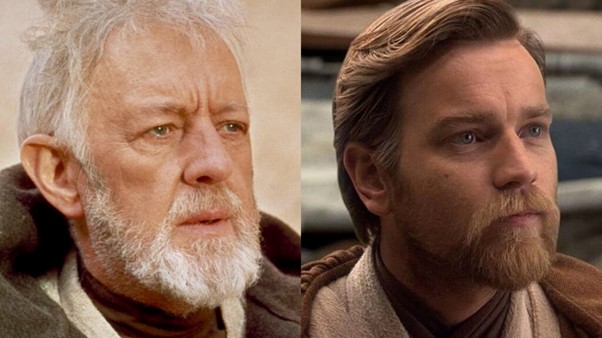
The use case started with finding good source and destination videos. We needed images of a young actor that we could age and images of an older actor whose face could be replaced by the Faceapp-generated images. Regardless, a large amount of footage had to be available to use in the training process. As given away in the intro of this blog post, the choice fell on Ewan McGregor and Alec Guiness; both actors played the young and old versions of Obi-Wan Kenobi respectively in the Star Wars films Episodes 3 (2005) and 4 (1977). This deepfake experiment would allow us to see what the film might have looked like if Ewan McGregor had played the role of the old Obi-Wan Kenobi now played by 63-year-old Alec Guiness in 1977.

left: Alec Guiness (1977), right: Ewan McGreggor (2005)
The Deepfake model requires two sets of images: source photos and destination photos. The destination footage is the video where we want to replace the face, and the source footage is videos with the actor whose face we want to “paste” onto the destination footage. For the destination footage we used a fragment of approximately 20 minutes with actor Alec Guiness from Star Wars Episode 4. For the source footage we chose a mix of images from Episode 3, but also some recent interviews with Ewan McGregor. In total we had just over an hour of source footage. Both the source and destination images contain a wide variety of angles and lighting situations. This is very important to achieve a balanced model, and we will explain some important points of interest at the end of this article in the tips section if you want to get started yourself. We then cut these videos frame by frame and had an algorithm search through these thousands of images to detect all the faces in the footage and export them into photos. This process also detects the other actors in the source material that we don’t want to use, and also produced a fair amount of false positives. Sometimes the algorithm did not detect faces where they should have been detected. DeepFaceLab, the tool we used, has some features to help you clean this up, but it still requires a fair amount of manual work. Processing the source video (1 hour of footage) ultimately resulted in 50,000 separate images with which we trained our model.
Training the Model
So, the dataset of 50000 images allowed to train our deepfake model. Within this step we also need to set various parameters and settings to the needs of the use case. This can sometimes take some trial and error, but the tutorial at the beginning of this article will help you make the right choices. Certain options are only enabled after the model has been trained for a while, because they could have an adverse effect on this. What’s important to note is that the higher quality you want your deepfake to be, the more memory it will require and the longer it will take to train. Not every PC can handle training a deepfake with high quality.
Aging the Source Actor
Now that the deepfake model has been trained on the young actor, we can move to the next step in the process. We want to age the source actor. This requires a smaller dataset of outdated faces. We had selected about 300 frames from the source video to age. These 300 frames were chosen to include as many different lighting conditions and some varied facial expressions as possible. To age the actor himself, FaceApp was used on these 300 frames. The outdated footage then had to be merged into a video file, which can then go through the same process as the source video (extracting all frames + faces from the frames).
Transfer of the model
Now that our model has gotten to the point where both actors are recognizable, but still lack detail/sharpness, it’s time to transfer the model to the new, smaller dataset of aged faces. In our case, this took 180,000 iterations, which together took about three days of training. The model then trained on the small data set on an additional 135,000 iterations, approximately two additional training days. Our use case therefore has its end result after 315,000 iterations or approximately five days of training.
Merging & Post-processing
Before we can render the final deepfake video, we need to merge the trained model, which means going through the destination video frame by frame and letting the model generate the correct face per frame. We can also adjust various settings, such as the mask blend, face sharpness, and color blend mode, for each frame. We found that a different combination of color blend modes was appropriate for each scene. The color mixing mode is also a setting in the training process. It may also be worthwhile to train different models with different blending modes, as both the setting within training and the setting within post-processing drastically affect the results. Now that the merging of images is complete, we can start rendering.
Ebsynth
As the very last step, we introduced one last existing tool: EbSynth. This allowed us to correct any residual errors that had crept into the model. EbSynth is a free tool for turning video footage into stylized “motion paintings.” The software transfers the look of one or more manually generated style frames to that of the target video, creating the effect of a hand-painted animation.

In the context of our Obi-Wan use case, we ran EbSynth on small framesets where some minor errors had crept in due to the deepfake process. Some good examples of where EbSynth can be used are when the face becomes (un)hidden and when a few frames are not detected (for example when the face is in a side perspective or when the face is too small on the screen). An example of using EbSynth in this context can be seen here:
There are references online where EbSynth has also been used to directly age a person in a video, but this result is not as effective.
Endresult
We’re ready for rock and roll. In the video of our experiment we compare the result of our deepfake use case with a deepfake that has not used any aging process and with the original unchanged result. For your viewing convenience, here are the two original actors from Star Wars again:
links: Alec Guiness (1977), rechts: Ewan McGreggor (2005)
Tips to get started
While going through this entire process, we came across some clear limitations. We hereby provide some practical tips for when you get started with a deepfake video yourself.
1) Note the size of the face on the original images
The size of the face in the original video has a major influence on a smooth deepfake processing process. When the actor’s face is too small in the frame (because the actor is standing too far away from the camera), DeepFaceLab has difficulty detecting a face. Flickering will often occur in the deepfake video. If the face is too large in the original image (e.g. too many close-ups in the source material), our deepfake model misses details. So choose your source images with this note in mind.
2) Lighting conditions
3) Side perspectives
Deepfacelab has serious problems detecting faces in side perspective. Even when the face is consistently detected, the trained result will often flicker and look unrealistic. EbSynth can help smooth this out a bit, but in general side perspective should be avoided if you want a believable result.
4) Looking up and down
If the filmed character looks up or down, we get conditions that are unknown to our deepfake model. This results in potentially very fickle results. The only thing you can do to avoid these types of issues is to try to find images of the source actor with the same unique viewing direction, but this may not always be possible.
Conclusion
We can conclude that if you take into account the existing limitations via the 4 tips above, you can create amazingly realistic deepfake videos in a very short time with existing tools. As long as you don’t have close-ups in the frame and want to film the actor in a normal forward-facing perspective, our provided process should work. Of course, each of these listed limitations can be overcome with customization and effort. We hope that this small experiment has given us a clearer idea of what deepfake video technology can do when you combine existing AI tools. As we can see from the results in our final showcase video, it is possible to use a small custom dataset to change the facial features to a limited extent even at the end of the project. On top of this result you could add facial hair, change the hair color of the characters, add scars… This shows how versatile and flexible these technologies can be and how easily they can be implemented within VFX projects. Our students still have to wait a little longer for the workshop, but you can certainly get started already. Thank you for reading to the end of this blog post. If you have any questions, do not hesitate to contact us at [email protected]